


Building an epaper laptop
14th March 2025 - Epaper laptop , Series , Hardware , Linux
Ever since I got my first ereader twelve years ago I’ve wanted an epaper laptop. The allure of a laptop which would work in direct sunlight and has incredible battery life has always drawn me. Sure, laptops have come a long way in the past twelve years, especially the battery life aspect has gotten much better. But there’s still nothing which beats epaper when it comes to the direct sunlight application. Whether or not I should spend my moments in direct sunlight on my computer is a wholly different question.
Unfortunately year after year I’ve waited for my perfect epaper laptop to arrive and it appears that it never will. And I haven’t been particularly picky either, the market just doesn’t seem to be there as at the moment there are no available epaper laptops at all. There are a couple tablets like the Remarkable series, the PocketBook InkPad, and Lenovos SmartPaper device to name a few. These devices focus on note-taking and document reading, which to me feels more like a replacement for a regular tablet than for a laptop (and don’t give me any of that Apple “What’s a computer” bullshit). What I want is a basic Linux machine with an epaper screen, nothing more. So, given that no-one seems interested in making this a product I’ve taken it upon myself to build one.
This has been a rather long process, so I will split the topic into multiple articles. In this first one I will write about the various pieces of hardware that has gone into this project, and in the following articles I’ll go in depth about parts of the hardware and write about the software, firmware, and customisations making this all possible.
The epaper panel
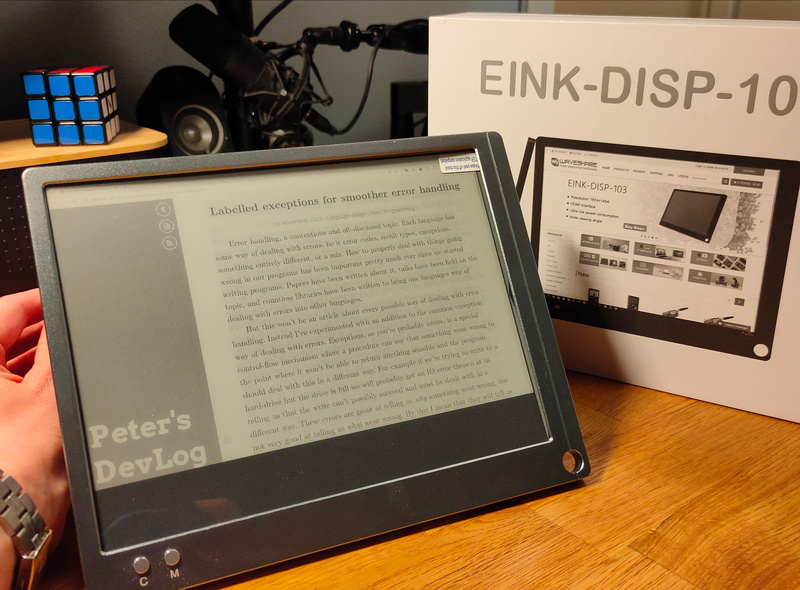 So, what do you need to create your own laptop? Back in 2021 when I seriously started looking into this and getting parts for the project, Waveshare had just released a 10.3” epaper HDMI display. After contacting Waveshare I was assured that the panel in this display was compatible with their epaper controllers. This would allow me to test out the HDMI solution first, then decide whether or not to go for the epaper controller and custom firmware route. The next article is going to be all about the monitor and how I ended up implementing it into the laptop, but I’ll give a quick overview of the HDMI monitor here. The HDMI driver board has a couple of physical buttons to toggle between modes. The panel itself supports 16 levels of greyscale, but doing this requires multiple refresh cycles which is quite a slow process. Therefore the controller also supports a much quicker mode which only does black and white. Using only black and white, or even the 16 shades of grey, you get some fairly obvious stepping in gradients, so the controller employs dithering to improve the perceived fidelity. The dithering algorithm, along with the colour conversion function, and the driving force of the update all contribute to how good the image ends up looking. For my purposes I want to code on this thing, so input latency is more important than visual acuity. Being able to toggle some more visually pleasing modes on demand however would be useful for things like reading papers and articles with illustrations. But we’ll get more into this in the next article.
Actual laptop chassis
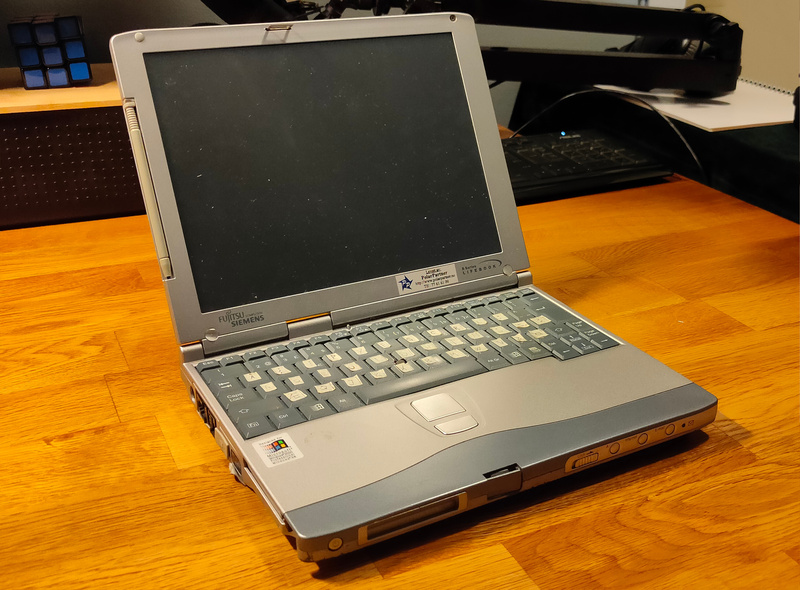 In addition to a screen I’d of course need the laptop body itself. Not wanting anything too bulky or weak I decided against solutions like 3D-printing a chassis. In addition I would have to somehow integrate a keyboard and mouse which would create more complications. Luckily I had two old laptops lying about, which where a perfect fit for the 10.3” screen. The exact laptop is a Fujitsu Siemens Lifebook B2154, with it’s 450Mhz processor, 198Mb of RAM (fully upgraded) and a 6Gb hard drive this thing was quite powerful for such a small machine when it was released. If the price is any indication, this was a swanky machine coming in at ~€1300 which adjusted for inflation would be ~€2500 today. One of these where my first ever laptop which I got as a hand-me-down from my father who got it from work, and which I’ve held onto for sentimental reasons. What better way to breathe some new life into an old machine! In addition these old machines already had a decent keyboard, a track-point mouse, along with some other buttons and ports I could reuse. Unfortunately the controller for the keyboard and mouse where both situated on the motherboard of the laptop, so these will have to be re-built.
The computer itself
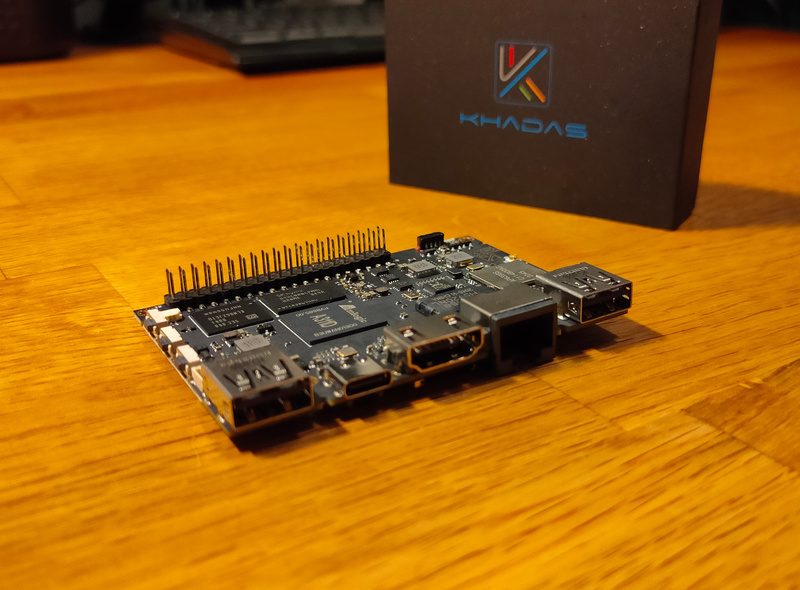 For the actual computer in this machine I wanted something decently powerful, and since I originally purchased most of the parts back in 2021 I landed on the Khadas Vim3. It’s a Raspberry Pi-esque single-board computer with rich IO and crucially a slightly thinner profile than the original Pis. The old machines are a bit chunky by modern standards, but still not so chunky I could fit a full-height Pi in there. I briefly considered an X86 based board, but since I wanted extreme battery life I opted against it. Linux has always had good ARM support compared to e.g. Windows, partially due to so much of the ecosystem being open source that it’s not up to any specific company to port their program to the platform. I had experience with running a Pi and knew what software was available already, and Apples announcement to switch to ARM based chips just the year prior made me quite sure than even the more desktop-oriented apps would offer ARM binaries fairly rapidly.
Battery management
Battery and battery management was next on the list. When starting out I expected this to be one of the easier parts, surely someone had created a USB C board with Power Delivery support for quick charging, charge passthrough (being able to both charge the batteries and draw power at the same time), and i2c battery indication. Surely! Turns out, no one had. At least none that I could find at the time. There where solutions which had some of the features, but no perfect solution. What I ended up with in the end was a power-bank PCB from AliExpress with PD and charge passthrough, combined with a standalone i2c battery monitor. It’s not a great solution, the PCB is quite big because it was meant to fit two 18650 cells on it, but at least for a test it should work fine. In retrospect I think I might end up building this elusive component myself if no-one beats me to it.
Summing up
And that should be mostly it! Full of expectation I ordered the parts and slowly started working my way through the list of things required to have a fully functioning laptop. The project is still not done, but I’ve gotten many of the hurdles down and it’s time to share. In fact the reason why I’m writing about all of this now is because I went to the FOSDEM 25 BOF “Open-Hardware E Ink Devices with Modos: Discussion & Demos”. It was so great to hear what everyone else was doing with epaper, and of course especially cool to see what Modos has managed to do with their hardware running epaper at astounding refresh rates. But hopefully more on that later, stay tuned! The whole experience really fueled me to take this project over the finish line.